How to Install Cabinet Pulls without a Template?
I recently decided to install new cabinet pulls in my kitchen, but I didn’t have a template to use. I knew it was possible to install them without a template, so I set out to find the best way to do it. After some research, I discovered a couple of simple and effective ways that anyone can use. In this article, I’ll share my experience and the steps I took to install cabinet pulls without a template.
Ways to Install Cabinet Pulls without a Template
There are several clever methods to install cabinet pulls without needing a template. These techniques use common household items or inexpensive tools. You can get professional-looking results with a bit of care and attention to detail.
Masking Tape Trick
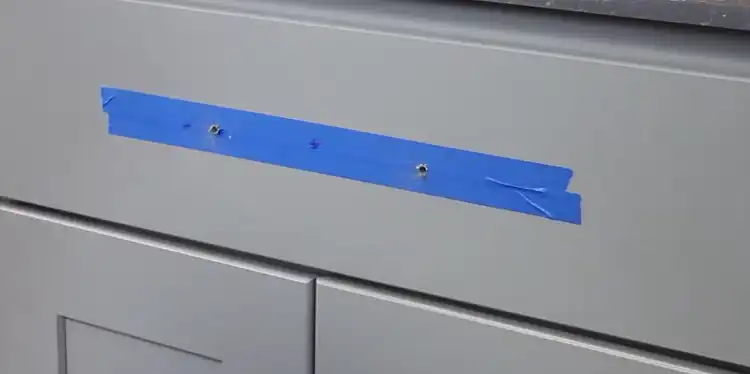
The masking tape trick is a simple and effective method to install cabinet pulls without a template. It’s a handy technique that doesn’t require any special tools or expensive gadgets. Here’s how it works:
First, grab a roll of masking tape and a ruler or measuring tape. Measure the center-to-center distance between the screw holes on the cabinet pull or knob. This measurement is crucial, so double-check it to ensure accuracy.
Next, place a strip of masking tape vertically on the cabinet door or drawer front where you want to install the pull. Use the ruler to mark the center-to-center distance on the tape, making small but visible pencil marks.
Now, align the cabinet pull over the marks on the masking tape, and press down gently to transfer the marks to the cabinet surface. You can even use an awl or a sharp pencil to make indentations on the cabinet surface through the screw holes of the pull.
Once you have the marks transferred, remove the masking tape, and you’re left with precise markings for drilling the pilot holes. It’s that simple! This method is especially handy when working with multiple pulls, as you can create a makeshift template on the tape and use it consistently throughout the project.
Use a Cabinet Pull Positioner
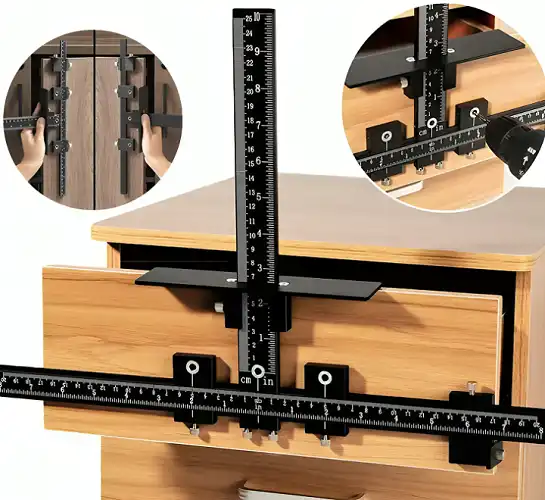
If you’re looking for a more specialized tool, consider investing in a cabinet pull positioner. This nifty gadget is designed specifically for accurately positioning cabinet pulls without the need for a template.
A cabinet pull positioner typically resembles a small ruler or a sliding jig with adjustable edges. You can set these edges to match the center-to-center measurement of your cabinet pull or knob.
To use the positioner, simply place it on the cabinet door or drawer front where you want to install the pull. Adjust the edges to the correct measurement, and then mark the screw hole locations through the holes on the positioner.
One of the significant advantages of using a cabinet pull positioner is its versatility. You can use it with a wide range of cabinet pull sizes and styles, as long as you correctly set the center-to-center measurement.
Many cabinet pull positioners also come with built-in level bubbles, ensuring that your pulls are installed perfectly straight and aligned. This feature is particularly useful when working on larger projects or cabinets with multiple pulls.
While a cabinet pull positioner is a specialized tool, it’s relatively inexpensive and can save you a significant amount of time and effort, especially if you have multiple cabinets to tackle. It’s a worthwhile investment for anyone who frequently installs cabinet hardware without templates.
Create a Cardboard Template
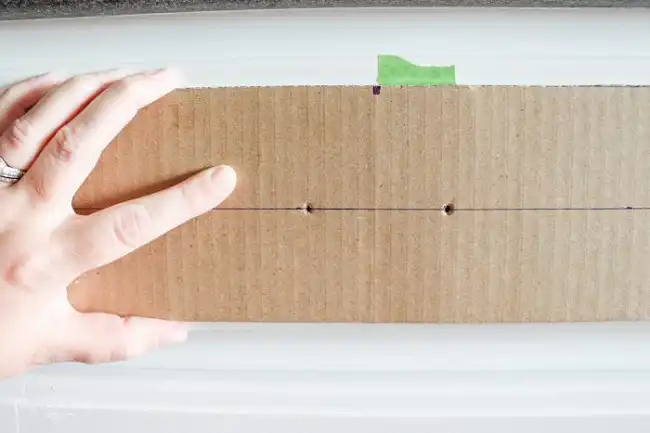
A simple yet effective method is to create your own template using cardboard. This DIY approach is inexpensive and can be customized to fit your specific cabinet pull measurement.
First, take the measurement of where you want to place the cabinet pull. Carefully measure the center-to-center distance between the screw holes on the pull itself. This measurement is crucial, so double-check to ensure accuracy.
Next, take a piece of cardboard roughly the same size as your cabinet door or drawer front. Using the center-to-center measurement you just took, mark the screw hole locations on the cardboard. You can use a ruler or measuring tape to ensure precise markings.
Once you’ve marked the screw hole positions on the cardboard, align it with the cabinet surface where you want to install the pull. Use a pencil or an awl to poke through the markings on the cardboard, transferring the screw hole locations onto the cabinet itself.
Now you have a clear guide for drilling the pilot holes in the right spots. Remove the cardboard template, and carefully drill the pilot holes using a drill bit slightly smaller than the screw diameter.
With the pilot holes drilled, you can proceed to install the cabinet pull by aligning it with the holes and securing it in place with the provided screws. Tighten the screws evenly to ensure a snug fit without over-tightening, which can damage the hardware or the cabinet surface.
This cardboard template method allows you to achieve accurate and consistent placement of your cabinet pulls without the need for a pre-made template. It’s a simple, inexpensive solution that can be customized to fit your specific hardware and cabinet measurements.
Issues You Will Have While Working without a Template
While installing cabinet pulls without a template is entirely possible, it’s important to be aware of some common issues that may arise during the process:
- Inconsistent Measurements: Without a pre-made template, there’s a higher risk of inconsistent measurements between pulls. Even a slight deviation in the center-to-center distance can result in misaligned hardware, which can be visually jarring and impact the functionality of the cabinets.
- Difficulty Maintaining Alignment: Keeping all the pulls perfectly aligned horizontally and vertically can be challenging without a template. Slight variations in marking or drilling can lead to crooked or unevenly spaced pulls, detracting from the overall aesthetic of your cabinets.
- Time-Consuming Process: Installing cabinet pulls without a template can be more time-consuming than using a pre-made template, especially if you have multiple cabinets or drawers to work on. Measuring and marking each pull individually can add significant time to the project.
- Potential for Errors: Without a template, there’s a higher risk of making errors, such as marking or drilling in the wrong locations. These mistakes can be costly, potentially damaging the cabinet surface or requiring hardware replacements.
- Lack of Consistency: If you’re working on a project that involves cabinets or drawers from different manufacturers or styles, maintaining a consistent look without a template can be challenging. Each pull may require different measurements and markings, increasing the likelihood of inconsistencies.
While these issues are not insurmountable, they do highlight the importance of taking your time, double-checking measurements, and being patient throughout the process. If you’re working on a larger project or value precision and consistency, investing in a pre-made template or a cabinet pull positioner may be a worthwhile consideration.
However, if you’re comfortable with a bit of extra effort and have a keen eye for detail, installing cabinet pulls without a template can be a satisfying and cost-effective way to update the look of your cabinets or drawers.
Wrapping Up
Installing cabinet pulls without a template might seem intimidating, but with the right tricks, it’s totally achievable. This guide has equipped you with the knowledge to tackle this project with confidence. Remember, take your time, measure carefully, and don’t be afraid to ask for help if needed. Now get out there and transform those cabinets!