How to Fix Bubbles in Drywall Tape?
Have you ever worked really hard on putting up new drywall tape, only to see ugly bubbles start popping up all over? It’s such a bummer when you put in all that effort but those lumpy blisters mess up your smooth finish. Well, don’t get too down – I’m here to walk you through fixing those annoying bubbles step-by-step. With a little hard work using my tips, you can say bye to those unsightly bumps and get your walls looking flat and flawless again. Grab your tools and get ready, because I’ll guide you every step of the way. By the time we’re done, those pesky bubbles will be gone and your walls will look brand new. So let’s not waste any more time – let’s get started on kicking those bubbles to the curb!
Step for Fixing Bubbles in Drywall Tape
Bubbles or blisters in drywall tape are a common problem that can occur due to various reasons, such as improper taping, inadequate mud application, or trapped moisture. These bubbles not only ruin the smooth appearance of your walls but can also lead to cracks and further issues if left unaddressed.
Before we get started, let’s gather our tools first:
- Utility knife
- Sandpaper (various grits – 80, 100, 120)
- Drywall joint compound (pre-mixed or in powder form)
- Mixing bucket (if using powdered compound)
- Drywall taping knife (wide and narrow options are ideal)
- 8-inch drywall trowel
Now, let’s get patching!
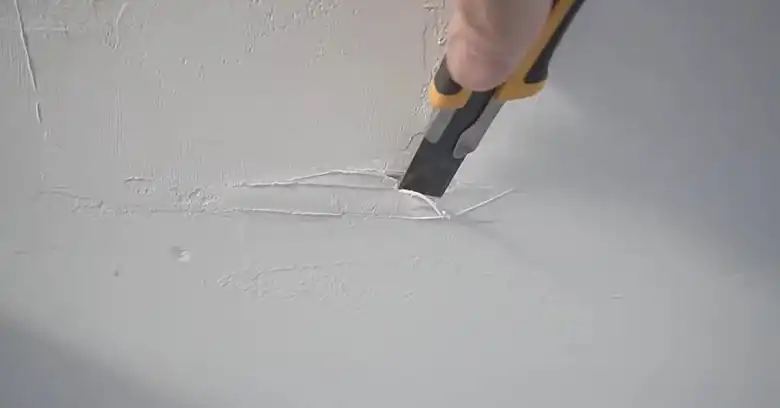
1. Identify and Cut Out the Bubble
Our first move is to isolate the bubble. Grab your utility knife and carefully slice a line down the center of the bubble, extending slightly beyond its edges. This creates a flap that we can easily remove.
For extensive bubbling, you might need to remove the entire section of tape. Don’t worry, we’ll replace it with a fresh piece later.
2. Prepare the Area
Now that the bubble is exposed, it’s time to prep the area for the patch. We want to create a clean and smooth surface for the new tape to adhere to. Using your mixing bucket (if using powdered compound) or your container of pre-mixed compound, scoop out a generous amount. Aim for a creamy consistency – think mashed potatoes, not whipped cream.
Spread a thin layer of this compound over the exposed joint or area where the tape used to be. Make sure this layer extends a bit wider than the width of the tape you’ll be applying.
3. Apply New Tape
With your freshly prepped canvas, it’s time for the new star of the show – the drywall tape! Grab a fresh roll and tear off a piece that fits the length of the repair area. Gently center the tape over the wet joint compound and press it down firmly.
Here’s where the drywall taping knife comes in handy. Hold the top edge of the tape in place with one hand, and with the other hand, glide the taping knife firmly down the length of the tape. This will embed the tape evenly into the compound and eliminate any sneaky air bubbles trying to crash the party.
4. Allow Drying
Patience is key here, my friend. Resist the urge to rush the process. Let the joint compound dry completely before moving on to the next step. This drying time can vary depending on factors like humidity and the thickness of the compound applied. Typically, it can take anywhere from a few hours to overnight.
5. Apply Additional Coats
Once the first layer is dry and cured, it’s time to build up some strength. Here’s where the 8-inch drywall trowel takes center stage. Dip the long edge of the trowel into your joint compound and apply a thin layer – about a sixteenth of an inch – over the entire strip of repaired drywall tape.
Let this layer dry completely, then repeat the process with one more coat of compound. This layering technique ensures a strong and smooth finish.
6. Sand and Finish
The final step! Grab your sandpaper and with a light touch, begin sanding the repaired area once the joint compound is completely dry. Start with a coarser grit sandpaper (like 80-grit) to remove any major bumps or imperfections. Gradually progress to finer grits (100 and then 120) to achieve a smooth and invisible finish. Remember, the goal here is to lightly buff, not aggressively gouge.
How to Stay Safe from Getting Such Issues?
While fixing bubbles in drywall tape is a straightforward process, it’s always better to prevent the issue from occurring in the first place. Here are some preventative measures you can take to avoid drywall tape bubbles:
Proper Tape Application
- Use slightly damp (not soaked) joint tape: This helps the tape adhere better to the joint compound and reduces air pockets.
- Embed the tape fully: When applying the tape, ensure it’s completely pressed into the wet joint compound, eliminating any air gaps.
- Use a taping knife: A taping knife helps firmly embed the tape and removes excess mud, minimizing air bubbles.
Joint Compound
- Apply adequate compound: Ensure you spread enough joint compound over the joint and surrounding area before embedding the tape. A thin layer won’t provide enough support and can lead to bubbles.
- Consistent application: Maintain consistent pressure and thickness when applying the joint compound throughout the taping process.
Drying Time
Before applying subsequent coats of joint compound, ensure the previous layer is completely dry. Applying the compound on a wet layer can trap moisture and cause bubbles later.
Alternative Materials
While traditional paper tape works well, mesh tape might be easier to work with for beginners as it allows for better mud coverage and reduces the risk of bubbles.
By following these tips and taking a careful approach during the drywall taping process, you can significantly reduce the chances of encountering bubbles and achieve a smooth, professional-looking finish.
What Not to Do While Repairing Bubbles in Drywall Tape?
While fixing bubbles in drywall tape, it’s important to avoid certain mistakes that can undermine your efforts or even worsen the problem. Here are a few things you should not do during the repair process:
- Don’t use excessive force: When pushing the tape flaps back down, be gentle to avoid tearing the tape or damaging the drywall surface.
- Don’t overfill the cavity: Applying too much joint compound can create a bulge instead of a smooth finish.
- Don’t skimp on sanding: Proper sanding between coats is crucial for achieving a seamless and invisible repair.
- Don’t rush the drying process: Let each coat of joint compound dry completely before applying the next one. Rushing can lead to cracking and peeling.
By being patient, and gentle, and following the proper techniques, you can successfully fix bubbles in drywall tape and restore the seamless appearance of your walls.
Wrapping Up
Once there was a room with really bad bubbles all over the new drywall tape. The walls looked so lumpy and uneven – it was an ugly mess! Seeing those bubbles would make any homeowner super unhappy. But you don’t need to worry anymore, because I’ve shown you the secrets to getting rid of those nasty bubbles for good! Follow the steps I explained, and you can turn those bubbly, messed-up walls into beautiful, smooth surfaces ready for paint or wallpaper. If you still have any other questions, just ask me – I’m here to help. So what are you waiting for? You’ve got this! Use my tips to defeat those awful bubbles once and for all. Get those gorgeous, flawless walls you deserve!